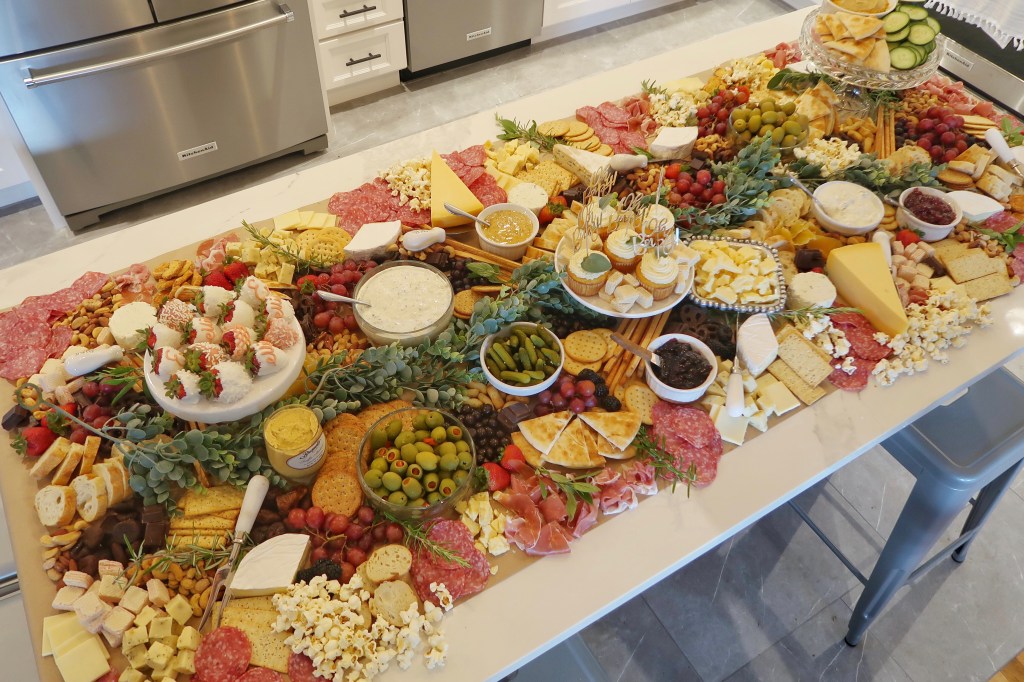
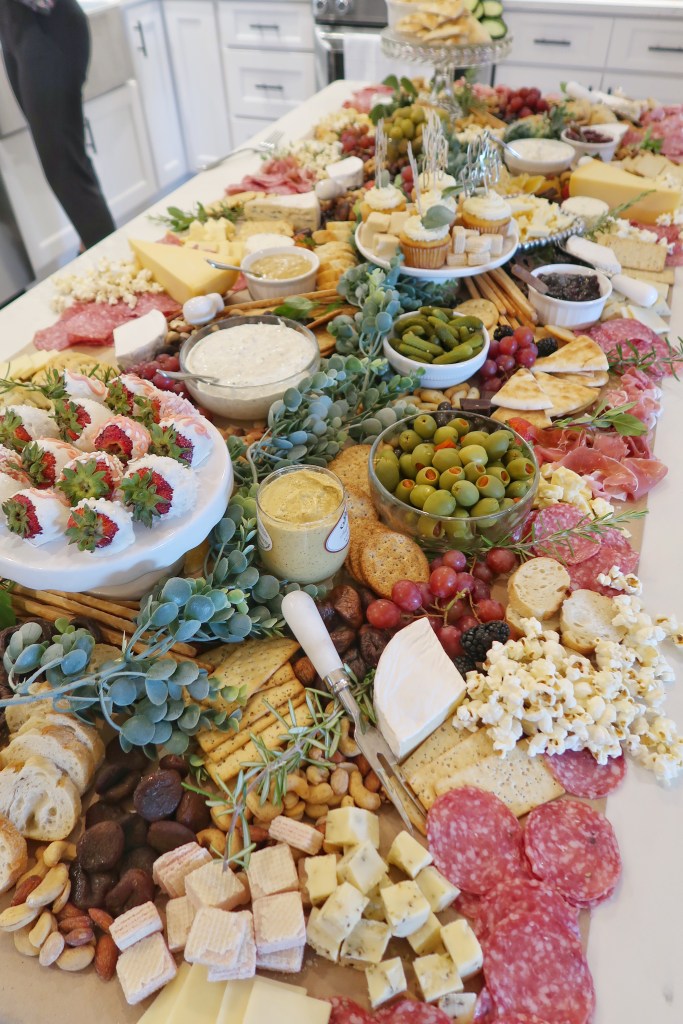
A couple weekends ago, I co-hosted a baby shower for one of my friends and she requested that instead of having a meal or appetizers or something, we do a giant charcuterie board on her kitchen island. Uhh, yeah, challenge ACCEPTED. If you know me, you know I love a good charcuterie board. In fact, I fancy myself somewhat of an amateur expert (is that an oxymoron?) when it comes to charcuterie boards. Even when I look back at this post about how to build a dinner party charcuterie board I’m like pshhh, child’s play. Okay now I am getting cocky but I am so excited to share with you the masterpiece that is our charcuterie table. I am going to list out all the items that we used and the order to putting it all together.

I’m also going to take 5 seconds to tell you to follow Cheese by Numbers on Instagram. I didn’t use her for this charcuterie table but it is just a really fun account and this seemed like an appropriate place to plug it!
Okay so first, you are going to want to start with your non food items:
- butcher paper to set everything on (makes clean up a breeze and if your space isn’t totally filled in, you can write down cute things like the names of the cheeses on it)
- some sort of centerpiece. I used this eucalyptus garland from hobby lobby but you can use flowers or candles or pine cones or pumpkins or truly whatever you want to be the center divider. You also don’t need to use anything at all but just start from the center and work your way out.
- small bowls for dips, jams, mustards, crumbly cheese, etc. as well as a couple elevated platters to create dimension. We placed these as we went and filled in spaces that need them.
- Cheese knives. We used 8 of them but those go on the table last.
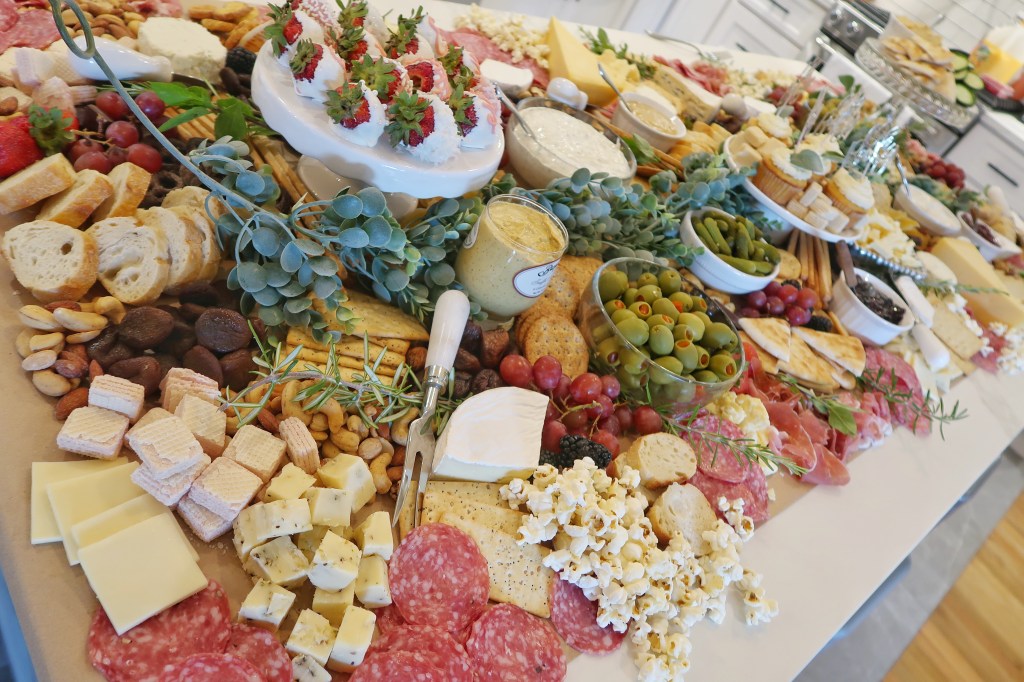
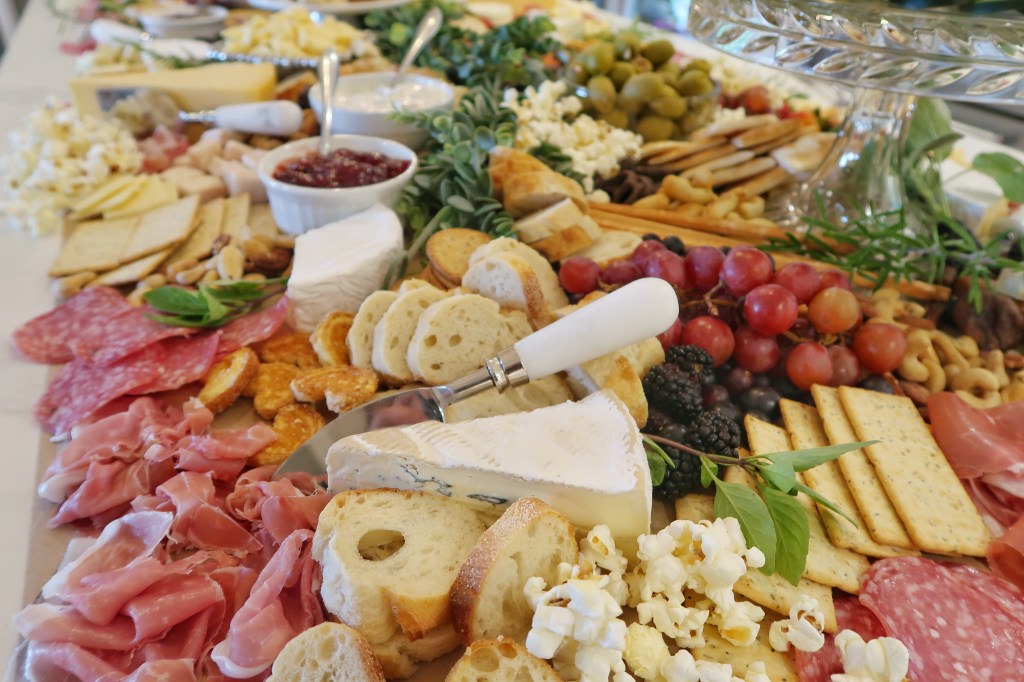
Ok then you want to start with the foods that are least likely to get stale. We started building the table about 1.5 – 2 hours before the party started. You just start by putting handfuls at a time of each item around the table. You can always add more. It is going to look weird and sparse at first but have no fear, this baby will fill up. ALSO, a great tip is to look for things at places like home goods in their food section. They have lots of little crackers and jams and mustards that usually cost you less than a specialty shop or sometimes even a normal grocery store. Here are the non meat/ cheese items we used:
- A variety of crackers (you can get one of the celebration packs at Costco that has 6 options). I think we only used about 3 sleeves of crackers for 35 people
- skinny cracker breadsticks and random crackers like cheddar twists from Trader Joe’s or rosemary twists from home goods. Something that looks different than a normal cracker.
- fresh baguette slices
- mixed nuts
- chocolate covered pretzels
- dark chocolate bars broken up
- mini wafer cookies
- chocolate covered açaí berries
- dried apricots
- dried figs
- dried mango slices
- mini palmier cookies (home goods!)
- green olives
- popcorn (we sprinkled this around at the end wherever we needed a little something extra)
- pita bread cut in triangles
- hummus
- cucumber slices
- pickles
- grapes (green and red)
- strawberries
- blackberry
- blueberry jam
- apricot jam
- fig jam
- truffle mustard
So once you get a pretty healthy heaping of all of those goodies, you will want to make sure you are within a 30-40 minute window before you start putting out the meats and cheeses. Actually, cheese is apparently supposed to be served closer to room temperature according to the French but you still don’t want it to get to the point where it is getting *too* warm and shiny. Yuck. I found the best way to do this was to buy from Costco as we were going to need a large amount for our group and to make an impact on the table. Here are the meats and cheeses I got:
- three-pack of Boursin soft cheese
- two wheels of brie (I sliced these into thirds)
- blue cheese
- rugged English white cheddar (I crumbled this and put in a bowl)
- Beecher’s Marco Polo black pepper cheese (I cubed this)
- Gouda (I sliced this in half and let people cut their own pieces)
- Italian dry salami (you want to pull each piece apart and place them in piles individually, not just throw a stuck-together strip of salami down.
- Italian prosciutto (I pulled each slice apart into 2-3 piece and piled it)
So there you have it! I like to finish my boards off with some fresh herbs like rosemary sprigs, sage, and basil. We also placed some chocolate covered strawberries and cupcakes on stands to make it a bit more festive for the shower. You could put cute holiday decor on stands, napkins, or appetizers on them too! Happy building!

Love how the popcorn groupings look like hydrangeas!!
LikeLike
I appreciate how comprehensive your list is! Thank you for being so transparent about how you built this, I love how you filled up the space!
LikeLike
Love this! How big was the table (area to be filled)?
LikeLike
Using your extremely helpful guide for my daughter’s second birthday party. Adding more fun dessert type things into the mix as well and for the centerpieces I have jars filled with colorful Pom poms and gold animal figurines to fit tye theme. Thank you for the guide!!
LikeLike
Looks awesome! About how many people did you use this for?
LikeLike
Thanks, Kim! Great question…I want to think it was around 30ish. We had a lot of leftovers too haha
LikeLike